Aligning the antennas of a LibreRouter with LimeApp
Achieving the best possible alignment on a Wi-Fi link is very important for the proper functioning of the community network and its performance.
It is strongly recommended to aim the antennas as well as possible, even when the perceived usability of the network is acceptable to the people using it. Stacking links of insufficient quality leads to a network with problems that are hard to diagnose, or to diagnostics that cannot be trusted.
It is a low-complexity task that requires dedication, patience, and time.
Contents
- 🙌 Recommendations before you start
- ✅ Verify that the LibreRouters are linked
- 🎯 Let's align!
- 📌 Things to keep in mind
🙌 Recommendations before you start
To work properly, a few prerequisites and materials need to be checked:
- Check the weather conditions in advance. Do not work on windy, drizzly, or extremely hot/cold days.
- Wear appropriate clothing, footwear, and safety equipment, especially for work at dangerous heights.
- Verify the correct installation of the node and its mounting structure.
- Check that everything is firm, with no pendulum or rotational movement, and that the device is solidly attached to the mast. You can follow this checklist.
- Whenever you are at the height of the node, take the opportunity to inspect the integrity of all its parts: connectors firmly attached, cables and enclosure in good shape, LEDs on, etc. When antennas are out of reach, this task becomes much harder. Whenever possible, place them within reach and in comfortable working positions, even if that is not the highest point.
- Loosen the antennas a little, but tight enough that they do not move unless you hold them. This lets you move them during alignment.
- Confirm a clear line of sight. The electromagnetic waves of Wi-Fi links weaken significantly when they pass through objects, trees, and other obstacles. For this reason, it is important to verify that there is a clear line of sight between the two mounting points. The Participatory Mapping of a Free, Community Network material can be very useful.
- Analyse the possible link on a map. Look at a satellite map in advance, draw the line, and reference the alignment with something close-by that is visible to the naked eye.
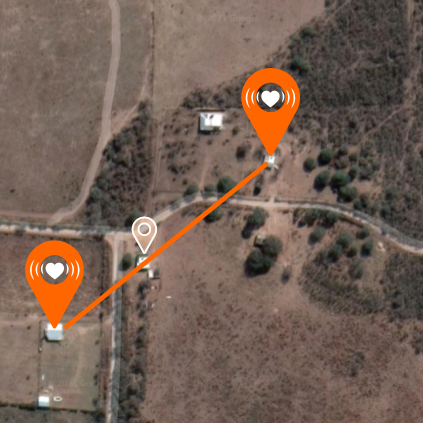
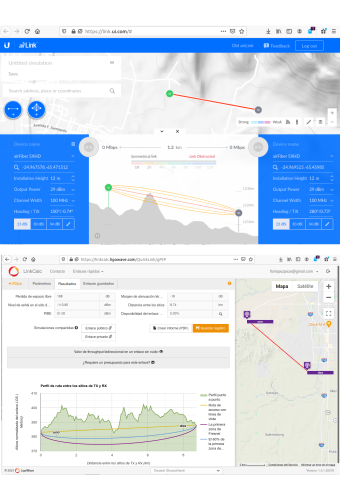
- Analyse the elevation profile of the terrain and assess the feasibility of the link. In this profile, pay attention to the exact location of both antennas, the line of sight between them, the curvature of the Earth, and the Fresnel zone. There are link calculators that combine this data automatically — you only need to learn a little about how to use them. Two free options, for example, are airLink and LigoWave.
✅ Verify that the LibreRouters are linked
- If the LibreRouter nodes are about to be installed: power them on beforehand to confirm they work and link correctly. Trying to align antennas that are already mounted but do not link can be very frustrating.
- If the LibreRouter nodes are already installed: make sure they are powered on and that LimeApp is reachable from both.
If the LibreRouter does not see any signal, or does not see the signal of the node you want to point at — i.e. it does not link to the target node:
- LimeApp reports the situation on a screen that reads «This radio is not linked to other nodes».
- Check that you are pointing correctly: If you are aligning Antenna 1 (Radio1), make sure you are pointing at Antenna 1 of the other node. Same for Antenna 2 (Radio2). You can align 1↔1 and 2↔2 without crossing them.
- Try a first «by eye» alignment until you obtain a link, even if the signal is poor.
- If you cannot get any link after a while, re-check that both devices power on and reach LimeApp. If the problem persists, re-evaluate the line of sight, inspect the integrity of the node parts, and/or test the devices unmounted at a short distance.
🎯 Let's align!
Using the Alignment tool of LimeApp
All the details about this tool are in the Alignment page. Don't skip it! 🤓
- Open LimeApp of the base node you are working from.
- From the menu, go to the Alignment screen.
- Pick the node you are aligning against, and open the specific, detailed information.
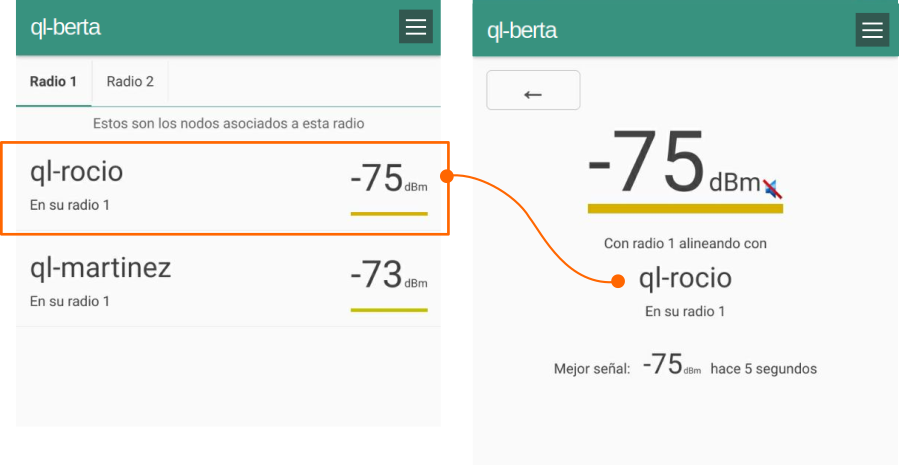
The goal is to reach a value as close to 0 (zero) as possible. This value represents the quality of the link, measured in dBm (decibel-milliwatts). It is always a negative number, so -65 means a better signal than -72.
LimeApp uses the colours green, yellow, and red to identify whether a link signal is of good, medium, or low quality.
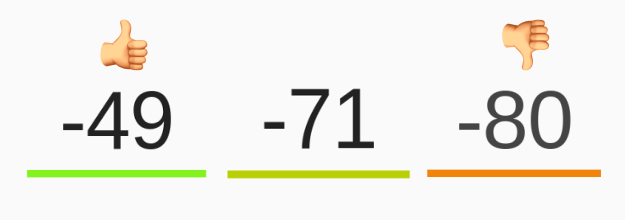
✔ Treat the best value you have repeated several times as valid. ✘ Discard isolated values that represent a sudden jump in the measurement, however good they look, because they are not representative. 🟡 If the best value you can get is a medium-quality link, the community may decide that this link is necessary for the network, even if you cannot improve the signal value. 🔴 Low-quality links provide a very poor user experience and erode the social fabric of the network. It is best to refuse them.
Going for it!
The key is to move the antenna slowly and millimetre by millimetre, paying attention to the change of value on the screen.
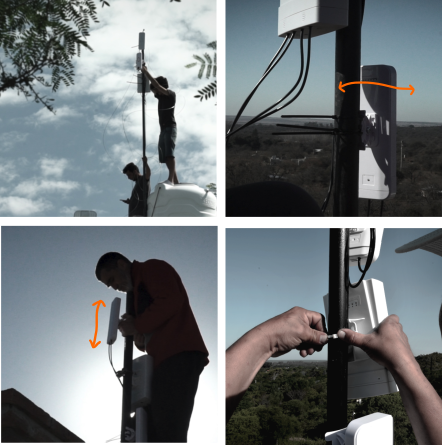
- Move the desired antenna horizontally ↔ until you get the best value.
- Do the same vertically ↕ until you reach a value that is the same as or better than the one obtained during the horizontal movement.
- Finally, repeat the procedure horizontally, stopping at the best value you recorded or any improvement on it.
- Once the best alignment is achieved:
- Tighten the antenna to the mast or structure, firmly, so that it does not move in the wind.
- Check that the previously achieved value does not change. It is common for tightening to cause small movements that worsen the result.
- Correct these variations as you tighten, slowly and patiently.
- Repeat the same task on the LibreRouter(s) at the other end of the link.
📌 Things to keep in mind
Long links
On long links, alignment is more sensitive to movement because the illumination angle widens.

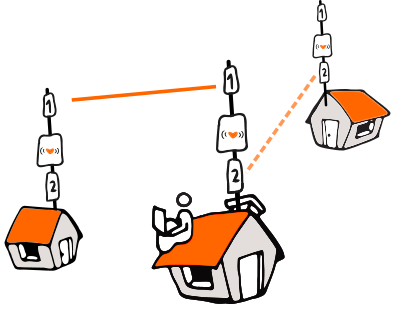
Covering an area
In a mesh network, sometimes you decide to point at, or illuminate, an area or several nodes at once, instead of a single specific node. In that case, you can point at the most central node of the area of interest, and check that the signal level is acceptable at every node to be linked. Don't forget that all the involved nodes must use the same radio/antenna.
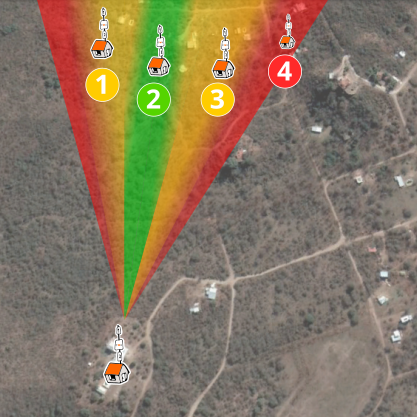
For example, in the image above, the coverage angle aims to reach nodes 1, 2, and 3 with reasonable link quality for each one:
- Node 2 has the best link quality, being at the centre of the focus.
- Nodes 1 and 3 have lower but still acceptable link quality, thanks to the aperture angle of the LibreRouter's sectorial antennas.
- More distant points, which would link with low quality, should be avoided because they hurt the overall performance of the network, like node 4 in the example.
Attribution. Translated from «Alinear antenas de un Equipo LibreRouter con LimeApp 1.4» by AlterMundi, licensed under CC BY-SA 4.0.